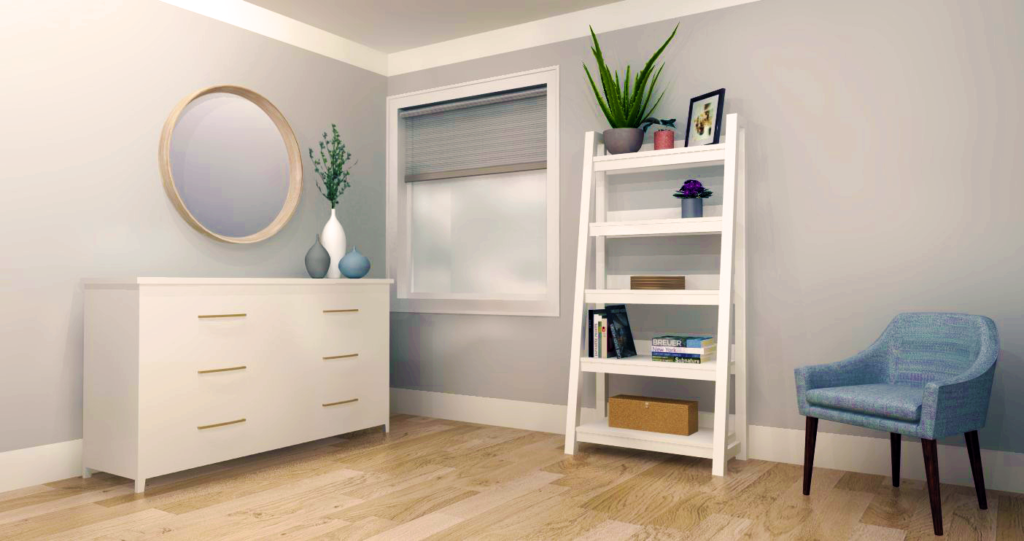
In the world of interior design, where functionality meets aesthetics, the bookshelf ladder has been steadily gaining popularity. An elegant and versatile piece of decor that seamlessly blends into almost any room.
What Is The Appeal Of A Bookshelf Ladder
Space Optimization and Aesthetics:
Bookshelf ladders are a fantastic way to optimize vertical space in your living area while adding a touch of unique aesthetics. They can transform an ordinary bookshelf into a functional and interesting piece of furniture.
Customization and Personalization:
One of the key advantages of building a bookshelf ladder yourself is the ability to customize it according to your preferences. You can choose the type of wood, stain, paint, and even the ladder’s design to match your home’s decor. Browse interior design magazines, websites, and social media platforms for ideas that resonate with you.
Create Focal Points:
A bookshelf ladder placed against a blank wall, in an empty corner, or even as a room divider, becomes a focal point that can anchors the entire space. With careful selection of materials, finishes, and design elements, your DIY bookshelf ladder can seamlessly complement your existing décor, adding a touch of character and warmth.
So, are you ready?…
Showcase your skills and creativity by crafting your own DIY bookshelf ladder!
Hi, I'm Trish

Welcome to Wooden Artisan where it’s my passion to share inspiring diy woodworking projects for woodworkers and creators like you.
Let’s get inspired and
start building!
Disclaimer:
This site includes affiliate links. I may receive a commission if you click on a product link and make a purchase through the affiliated website. Please note that this comes at no additional cost to you. I only recommend products and services that I believe in and think will be of value to my readers.
Preparing For The Project
Materials:
Wood Frame:
4 – 2×2 @ 8 foot long
4 – 1×2 @ 8 foot long
Choose the type of wood that aligns with your vision—pine, oak, maple, or reclaimed wood for a rustic touch.
Wood Shelves + Backing:
3/4” plywood.
You will use just over half a sheet.
Fasteners:
Finishing Supplies:
wood filler (optional)
Select a paint, stain or sealant that complement your chosen wood and room décor.
Tools You'll Need
Basic Tools:
Cutting and Shaping:
Miter Saw: A miter saw is ideal for angle cuts and precise measurements.
OR
Circular Saw: A circular saw is excellent for straight cuts.
Finishing Tools:
Sandpaper or Sanding Block – (depending on you wood choice #80 and #100 grit
Paintbrushes or Rollers: Depending on your choice of finish material you will need the correct applicator.
Safety Gear:
DIY Bookshelf Ladder: Step-By-Step Guide
Now that you have your materials and tools ready, it’s time to roll up your sleeves and start building your DIY bookshelf ladder. This section will guide you through the step-by-step construction process. Follow these instructions carefully to ensure a successful and rewarding project.
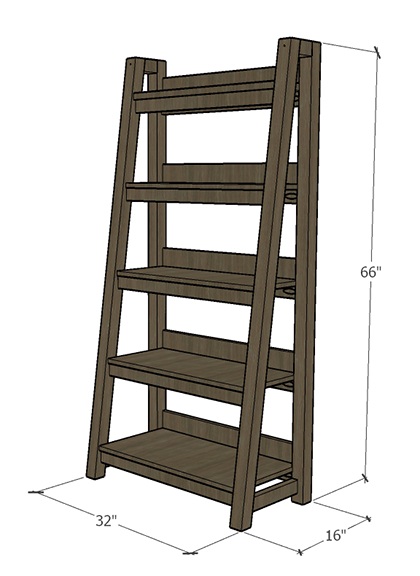
Step 1: Prepare Your Workspace
Clear a clean and well-lit area for your construction. Lay out your materials and tools within easy reach. Consider using a sawhorse or workbench to support your wood pieces during cutting and assembly.
Step 2: Cut Pieces For The Side Frames
2.1
2.2
2.3
2.4
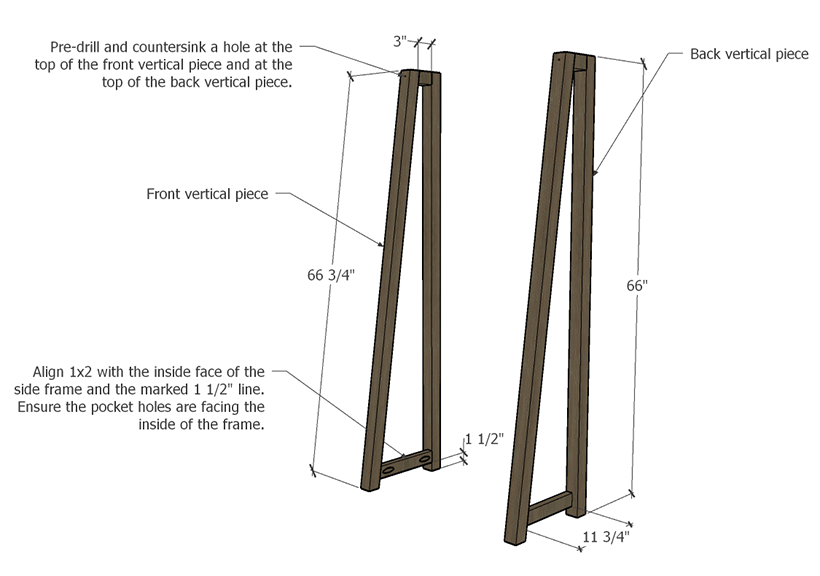
2 – 2×2’s @ 66” long
Square cut both ends
These will be the back two pieces for the frame sides.
2 – 2×2’s @ 66 3/4” long
8 deg Mitered cut on both ends.
These will be the front two pieces for the frame sides.
2 – 2×2, 3” long
Square cut one end and 8 deg mitered cut on the other end.
These will be the top two pieces for the frame sides.
2 – 1×2, 11 3/4” long
Square cut one end and 8 deg mitered cut on the other end.
These will be the bottom two pieces for the frame sides.
Tip: Sand and Smooth Edges
After cutting, use sandpaper, a sanding block or an electric sander to smooth any rough edges or surfaces. There are a lot of tight spots that are hard to reach after the wooden ladder shelf has been assembled. So, taking the time to sand your wood pieces before assembly ensures a polished finish and reduces the risk of splinters.
Step 3: Assemble the Ladder Side Frames
3.1
3.2
Bottom Horizontal Pieces:
Using a pocket hole jig, create ¾” pocket holes at both ends of the 1×2 components. Drill only a single pocket hole per end to prevent wood splitting.
On a flat surface, layout one of the side frames with one back piece and one front piece.
Mark a guide line 1 1/2” up from the bottom on both front and back vertical pieces.
Apply wood glue to the ends of the bottom horizontal 1×2 pieces and align with the inside face of the side frame and the marked 1 1/2” line. Ensure the pocket holes are facing the inside of the frame. Clamp in place if needed, and attach using 1 1/4” pocket hole screws.
Top Horizontal Pieces:
Apply wood glue to the ends of the 3” horizontal piece. Align this piece at the top, between front and back vertical pieces. Use a carpenter square to ensure this piece is sitting square and flush. Clamp in place to prevent shifting.
Pre-drill and countersink a hole at the top of the front vertical piece and at the top of the back vertical piece.
Apply wood glue in the hole and drive in a 2 1/2” screw. By countersinking this screw you can apply some wood glue and insert a wooden dowel to plug and hide the screw from view.
Repeat this step to complete both side frames of the bookshelf ladder.
Make Note:
Ensure the 1×2’s at the bottom are both aligned and flush with the inside of the side frames. Also ensure that the pocket holes are facing the inside of the frame.
Step 4: Cut and Install Shelf Supports
4.1
4.2
4.3
4.4
4.5
4.6
4.7
4.8
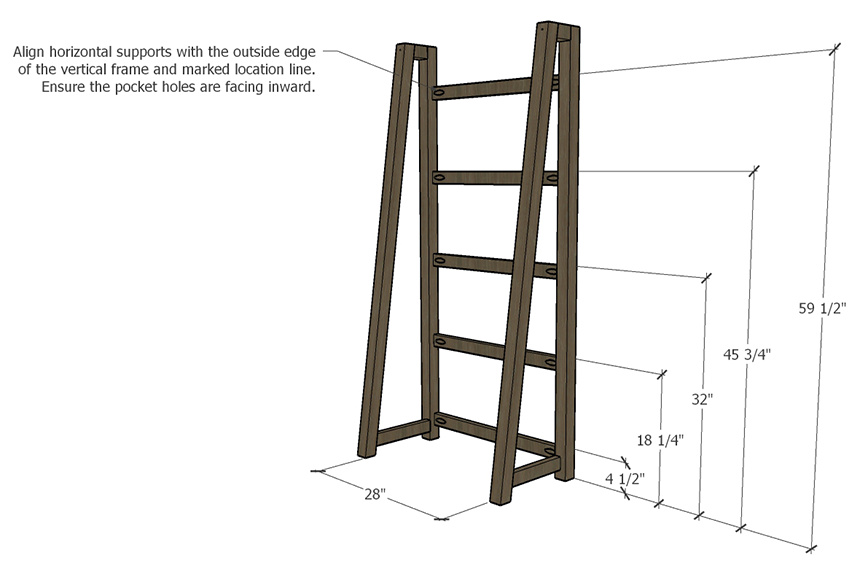
Cut 10 – 1×2’s @ 28” long
5 of these pieces will be installed at the back, between the two side frames.
5 of these pieces will be installed at the front, between the two side frames.
Using a pocket hole jig, create ¾” pocket holes at both ends of each of these components. Drill only a single pocket hole per end to prevent wood splitting.
On a flat surface, layout one of the side frames with the inside facing up. Mark out the location for these 1×2 supports along the back vertical piece.
Using a pocket hole jig, create ¾” pocket holes at both ends of each of these components. Drill only a single pocket hole per end to prevent wood splitting.
Apply wood glue to the end of the 1×2 support and align this piece with the outside edge of the vertical frame and the marked location line. Ensure the pocket holes are facing inward.
Secure using 1 1/4” pocket hole screws.
Attached all 5 – 1×2 supports along the back piece of the side frame.
Repeat these steps to attach the other side of these supports to the opposite side frame.
4.9
4.10
4.11
4.12
4.13
4.14
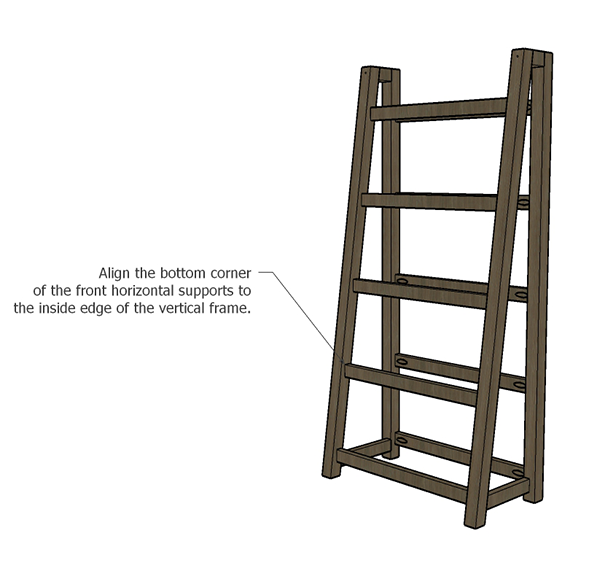
On a flat workspace, flip the unit on its side. Use a scrap board and a square to mark a line on the front vertical 2×2. This will ensure the front supports are aligned and at the same height as the back.
Attach the second set of 5 – 1x2s along the front vertical 2×2.
Apply wood glue to the end of the 1×2 support and align this piece with the marked location line. Since the front vertical 2×2 is on a slight angle these supports wont align with the front edge of these pieces.
Simply, align the bottom corner of the 1×2 support to the inside edge of the vertical frame. Use the marked location line as a guide to ensure the support is straight and level with the back support.
Secure using 1 1/4” pocket hole screws.
Attached all 5 – 1×2 supports along the front piece of the side frame.
Repeat these steps to attach the other side of these supports to the opposite side.
Step 5: Cut Shelves
5.1
5.2
5.3
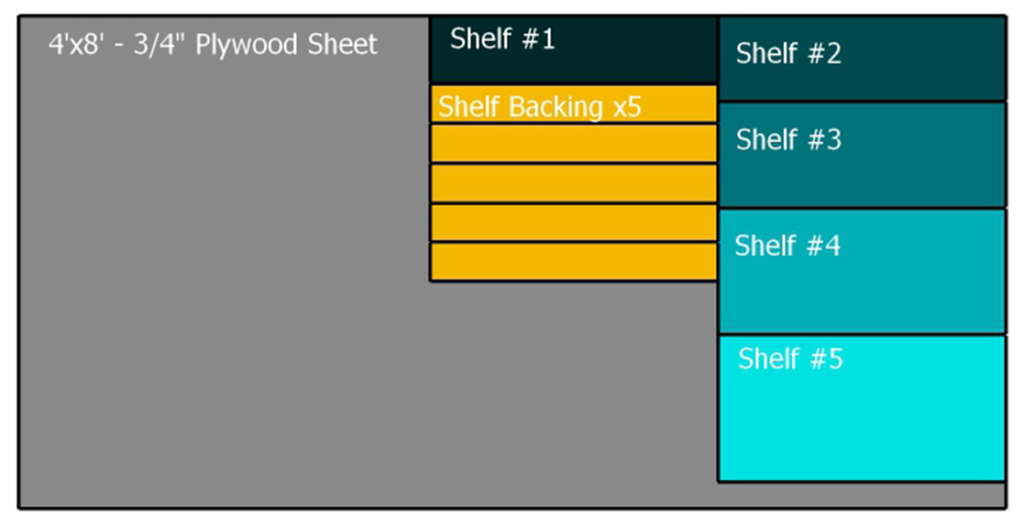
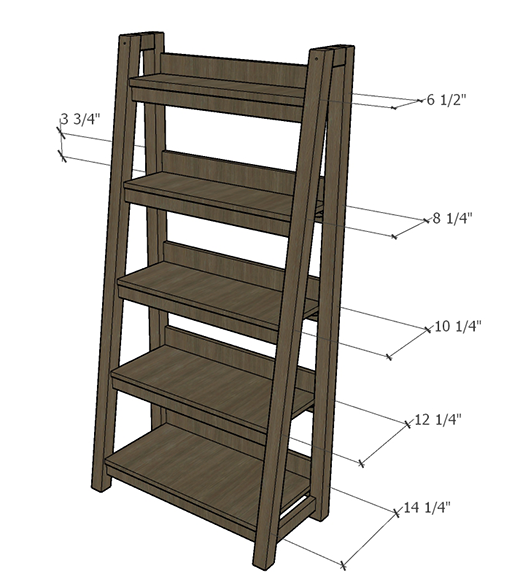
The shelf material is 3/4″ plywood. Each shelf is a different depth but all 28” long.
Cut 5 shelves to size.
Shelf 1 (top): 6 1/2” x 28” long
Shelf 2: 8 1/4” x 28” long
Shelf 3: 10 1/4” x 28” long
Shelf 4: 12 1/4” x 28” long
Shelf 5: 14 1/4” x 28” long
The shelf backing pieces are also 3/4″ plywood.
Cut 5 shelf backing pieces:
3 3/4″ x 28″ long
5.4
5.5
Sand smooth each shelf and back piece to make ready to apply finish.
Attached the backing to the shelf using wood glue and/or finishing nails. If you decide to use finishing nails, ensure you position the nail 3/8″ up from the bottom of the shelf to avoid puncturing through the top of the finished shelf. This may be tricky for some beginners so I would suggest to stick with using glue. It will be strong enough to hold the backing in place.
Apply wood glue to the back edge of the shelf and clamp the backing on until dry.
Step 6: Apply Finish
At this stage it is a good idea to apply any finish to your shelves and entire bookshelf ladder frame.
Depending on your design, apply paint, stain, or sealant to achieve your desired look.
For plywood shelving, consider applying and iron one edge banding for a more finished look.
Follow the manufacturer’s instructions for application and drying times. Once the finish is dry, move on to the next step.
Step 7: Install Shelves
There are a few different ways you can secure the shelves to the ladder frame.
- You could use brackets installed to the underside of the shelf.
- You could countersink screws into the top and finish with dowels.
- You could use a nail gun for less obvious attachment.
- Or you can simply apply wood glue to the top of the shelf supports and clamp in place until dry.
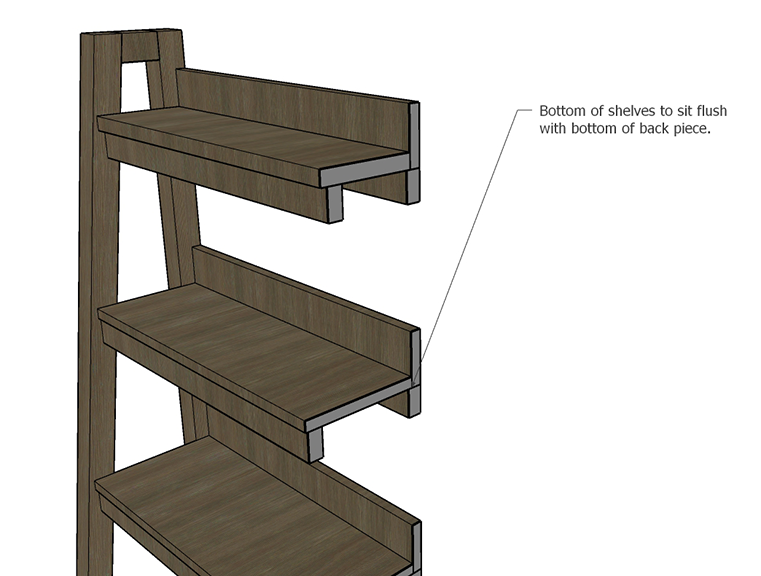
Whichever method you choose, install the shelf so the back is flush with the back of the frame.
Step 8: Placement
With your diy bookshelf ladder complete, carefully move it to its designated spot in your home. Ensure it’s level and secure against the wall. It might be a good idea to secure the ladder to the wall with brackets. This will ensure the ladders stability and weight-bearing capacity.
Attach L brackets to the inside of the back 2×2’s. Place one bracket at the top and one at the bottom. Secure to wall appropriately based on wall material.
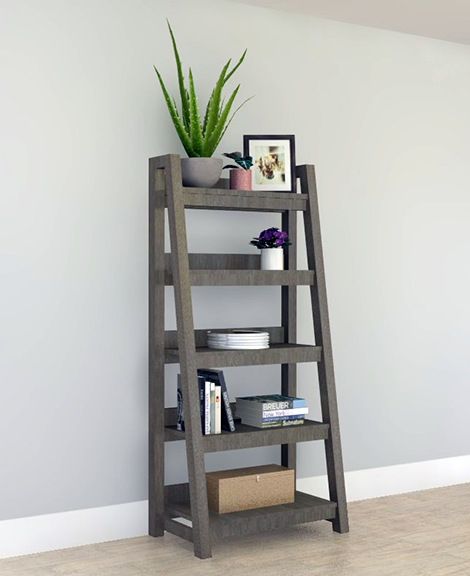
Take pride in your accomplishment!
Your DIY bookshelf ladder is now ready to decorate. Arrange your books, plants, and other items on the shelves to bring your ladder to life.


